
Zepo is a platform that allows you to simulate phishing attacks. Cybercriminals can bypass your spam filter to exploit your mail server, but Zepo cannot do it. Therefore, you need to configure your mail server to ensure your campaign statistics are not compromised. Below there are different tutorials depending on your email platform with some steps to include Zepo in your whitelist. Remember you need admin access to your email service to follow these configuration steps.
Office 365
1. Create a domain mail flow rule
The recommended approach to whitelist a domain is to use the mail flow rules in the Exchange Admin Centre (Exchange Admin Centre)
The advantage is mail flow rules is that we can whitelist a domain and also add some additional checks to it. Like part of the subject, DMARC result, or even a specific IP Address.
You can create a mail flow rule, and filter on sender or domain. And as an extra check, filter on IP Address. Because you probably know from which IP Address the mail is sent.
The process below is to whitelist a domain and sending IP(s)
Expand Mail Flow -> Rules
- Click + Add a Rule and select Create New Rule
- Put a name i.e. Zepo
- Apply This Rule If: The Sender -> Select Domain Is:
- Aboutpage.org
- Helpmail.info
- login-secured.link
- mail-campaign.com
- secure-contents.com
- track-emails.com
- zepo.app
- secured-login.link

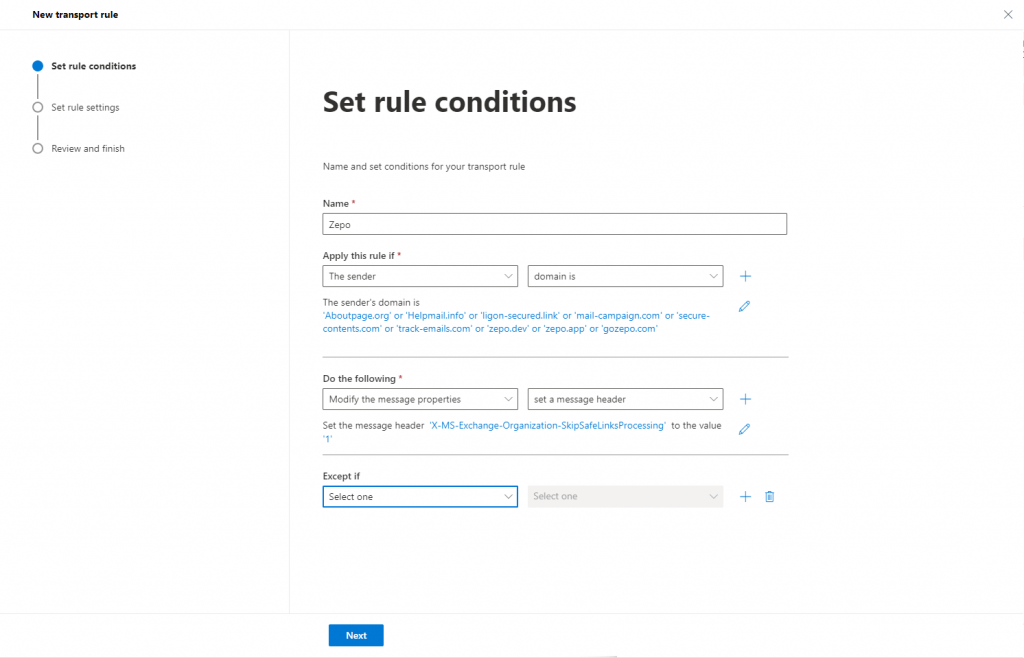
- Do the Following: Modify Message Properties -> Set a message header: and type X-MS-Exchange-Organization-SkipSafeLinksProcessing and set the value to 1.
- Click next.
- Do not modify anything in Set rule settings and save in Review and finish.
Once the rule is created we have to enable it. To do that click on Disabled on the rule you just created it and active the toggle to enabled.

2. Create an IP mail flow rule
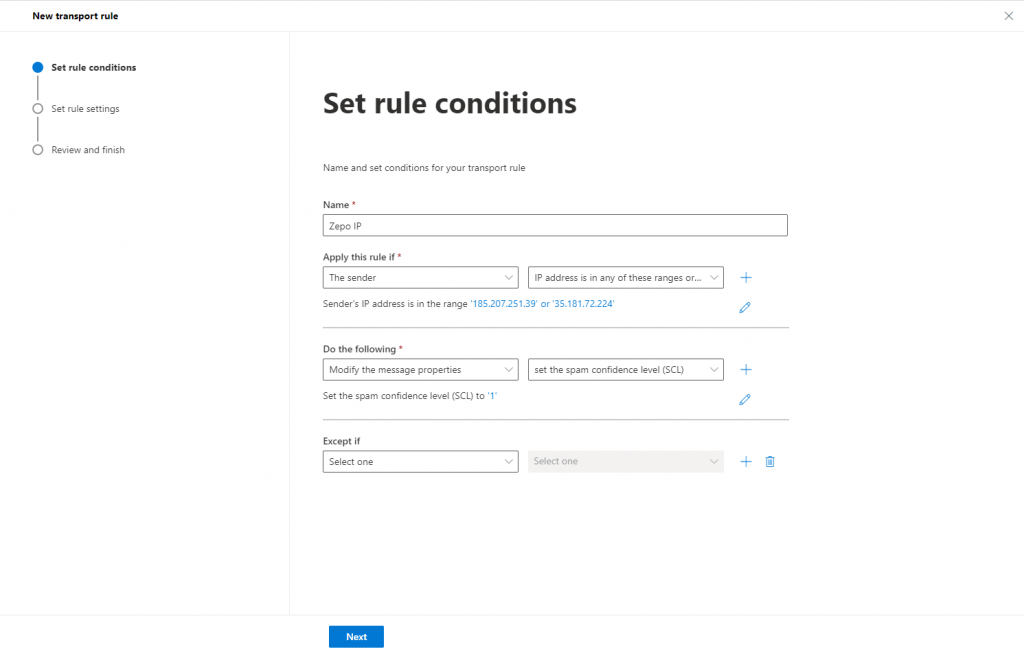
Following the same procedure we include the IP:
- Set the name of the rule:i.e. Zepo IP and include: 185.103.37.234, 185.103.37.235, 23.251.247.212, 23.251.247.211, 185.207.251.39, 185.249.227.54
- Apply this rule if: The sender is included in the IP address is in any of these ranges or exactly matches
- Do the following: Modify the message properties and set the spam confidence level (SCL) to 1
As the previous one we review it and finish.
After that we have to enable it
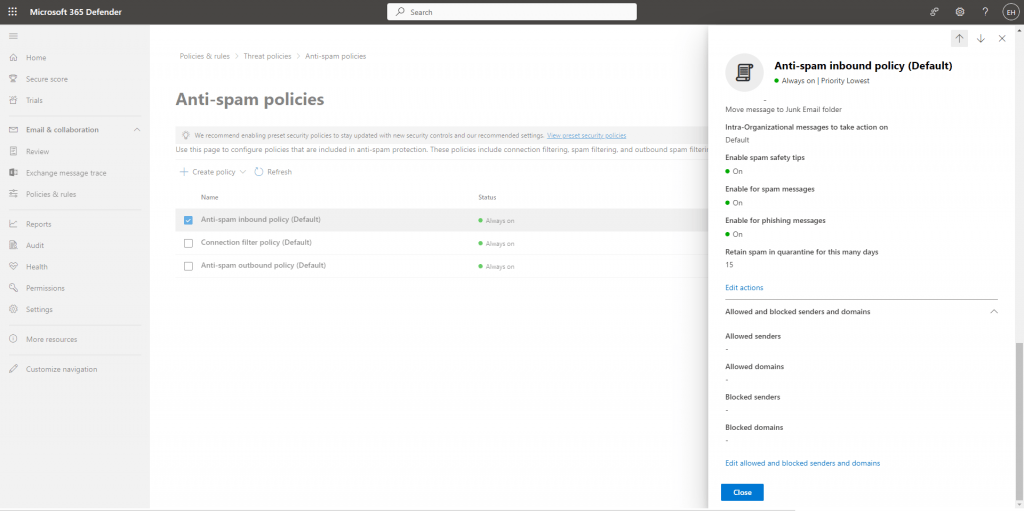
3. Whitelist Domains using Allowed Domains
To allow a complete domain or specific sender, we need to modify the inbound spam policy.
To edit the inbound SPAM rules you will need to go to the default policy locked in the Security side of M365, this area is best known as Microsoft Defender 365
- Go to Policies & Rules
- Treat Policies
- Anti-spam
- Click on Anti-SPAM inbound Policy (Default)
- Scroll all the way down in the fly-out and click on Edit allowed and blocked senders and domains
Enter the same list of the domains:
- aboutpage.org
- helpmail.info
- login-secured.link
- mail-campaign.com
- secure-contents.com
- track-emails.com
- secured-login.link
- zepo.app
Click in add domains and done.
4. Whitelist by IP public only
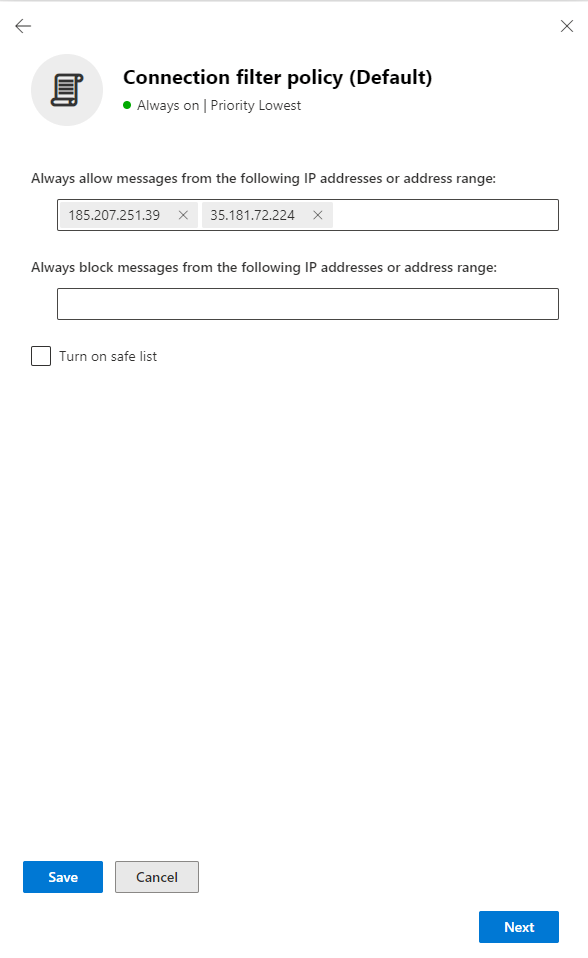
The setting for this are located in the same admin portal as the default inbound spam policy
- Go to Policies & Rules
- Treat Policies
- Anti-spam
- Connection Filter Policy (Default)
- Edit Connection filter policy
- Add the relevant public IP:
185.103.37.234, 185.103.37.235, 23.251.247.212, 23.251.247.211, 185.207.251.39, 185.249.227.54
5. Activate the Phishing simulation feature
-
In the Microsoft 365 Defender portal at https://security.microsoft.com, go to Email & Collaboration > Policies & Rules > Threat policies > Advanced delivery in the Rules section. Or, to go directly to the Advanced delivery page, use https://security.microsoft.com/advanceddelivery.
On the Advanced delivery page, select the Phishing simulation tab.
-
On the Phishing simulation tab, select the Add button in the No third party phishing simulations configured area of the page.
If there are already existing entries on the Phishing simulation tab, select
 Edit (the Add button isn’t available).
 -
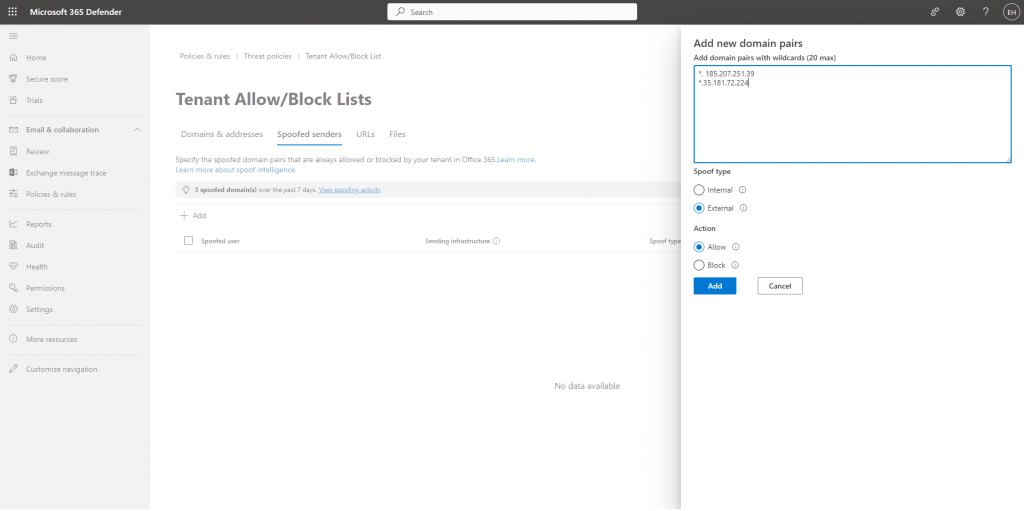
In the Add third party phishing simulations flyout that opens, configure the following settings:
-
Domain: Expand this setting and enter at least one email address domain by clicking in the box, entering a value (add the Zepo list), and then pressing the ENTER key or selecting the value that’s displayed below the box.
-
Sending IP: Expand this setting and enter at least one valid IPv4 address by clicking in the box, entering a value, and then pressing the ENTER key or selecting the value that’s displayed below the box. (Zepo IP: 185.103.37.234, 185.103.37.235, 23.251.247.212, 23.251.247.211, 185.207.251.39, 185.249.227.54)
-
Simulation URLs to allow: This setting isn’t required for links in email phishing simulations. Use this setting to optionally identify links in non-email phishing simulations (links in Teams messages or in Office documents) that shouldn’t be treated as real threats at time of click.
Add URL entries by expanding this setting, clicking in the box, entering a value, and then pressing the ENTER key or selecting the value that’s displayed below the box:
- *.aboutpages.org
- *.helpmail.info
- *.login-secured.link
- *.mail-campaign.com
- *.secure-contents.com
- *.track-emails.com
- *.secured-login.link
- *.zepo.app
- Once added, click on Save
-
6. Modify the green/red list
To fully allow emails sent from our sending IP, we need to add one last parameter, for this go to this page and click on Add.
This will open a side panel. You must enter the following information *,185.103.37.234; *,185.103.37.235; *,23.251.247.212; *,23.251.247.211; *,185.207.251.39; *,185.249.227.54.
This allows all senders from Zepo’s sending IP to be authorized.
Once added, click on Add and here we go!
7. Add Zepo phishing page URL to Safe Links
To avoid blocking our Zepo phishing urls by Microsoft Defender, We need to add a configuration in Safe Links, open this page and click on Create.
Once clicked, a page opens, you will have to pick a name for your safe links policy, i.e. Zepo safe links.
Add the audience you want to send phishing emails to in the next section, It can be users, groups or domains.
Then, take some time to carefully follow those settings in the picture:
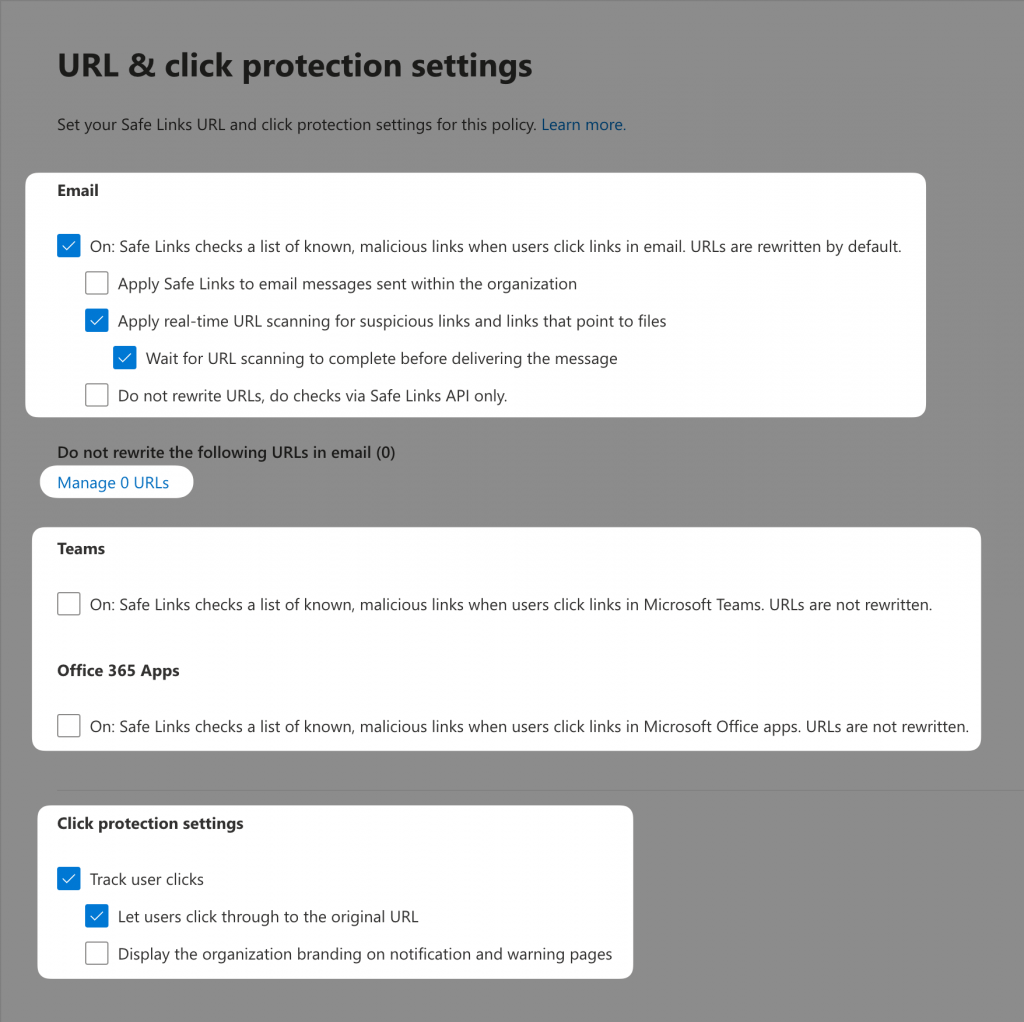
Click on “Manage URLS” and add the Zepo urls:
- *.aboutpages.org/*
- aboutpages.org
- *.helpmail.info/*
- helpmail.info
- *.login-secured.link/*
- login-secured.link
- *.mail-campaign.com/*
- mail-campaign.com
- *.secure-contents.com/*
- secure-contents.com
- *.track-emails.com/*
- track-emails.com
- *.secured-login.link/*
- secured-login.link
- *.zepo.app/*
- zepo.app
Then click next for the next steps and finish.
Try it out
Now that you have configured Microsoft Outlook workspace to receive Zepo emails, go back to the platform and test the configuration sending a campaing.
G-suite
1. Open Google Workspace admin
Sign in to your Google Admin console.
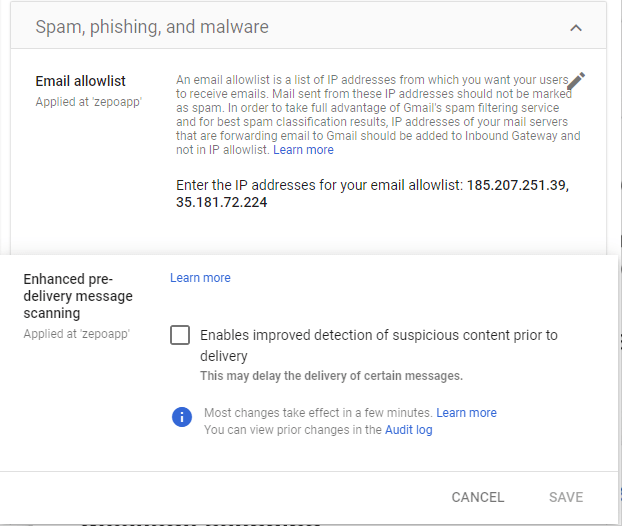
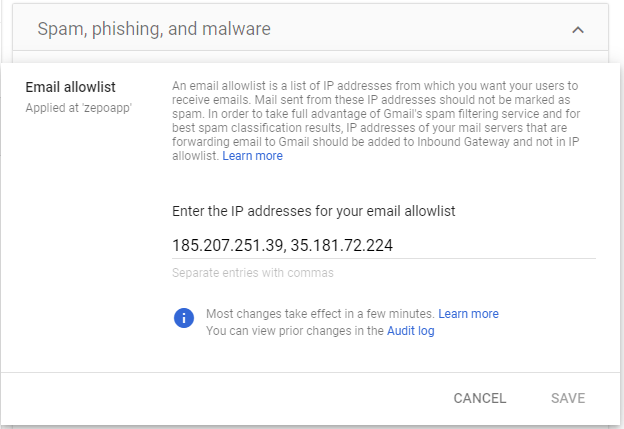
2. Whitelist the IP address
- In the Admin console, go to Menu
 AppsGoogle WorkspaceGmailSpam, Phishing and Malware.
 -
On the left, select the top-level organization. This is usually your domain.
-
On the Spam, phishing, and malware tab, scroll to the Email allowlist setting. Or, in the search field, enter email allowlist.
-
Enter the Zepo IP address separated individual IP addresses with commas (185.103.37.234, 185.103.37.235, 23.251.247.212, 23.251.247.211, 185.207.251.39, 185.249.227.54).
-
At the bottom of the dialog box, click Save.
Attention!
Changes can take up to 24 hours but typically happen more quickly. You can track changes in the Admin audit log. For further information you can access to the official Google site
3. Turn off the grey warning
It’s very likely that the following warning will be displayed by Gmail to your employees in your attacks:

Luckily, addressing this issue is straightforward. All our emails would come from the following list of domains:
- aboutpage.org
- helpmail.info
- login-secured.link
- mail-campaign.com
- secure-contents.com
- track-emails.com
- secured-login.link
- zepo.app
To ensure Google recognizes emails from these domains as legitimate, start by creating a new address list in the ‘Manage address lists‘ settings. Next, select ‘Add address list‘, which will prompt a new window to appear and include all the domains above to the list as in the picture.
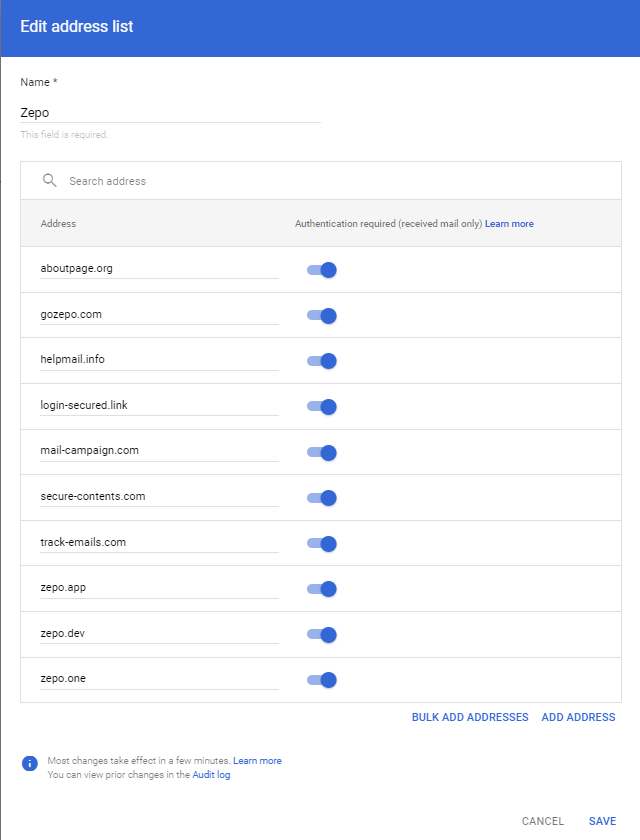
Then save everything, and close this settings page and reopen the Gmail spam, phishing and malware settings page, we’re going to add this list we just created in both the Spam and Blocked senders sections.
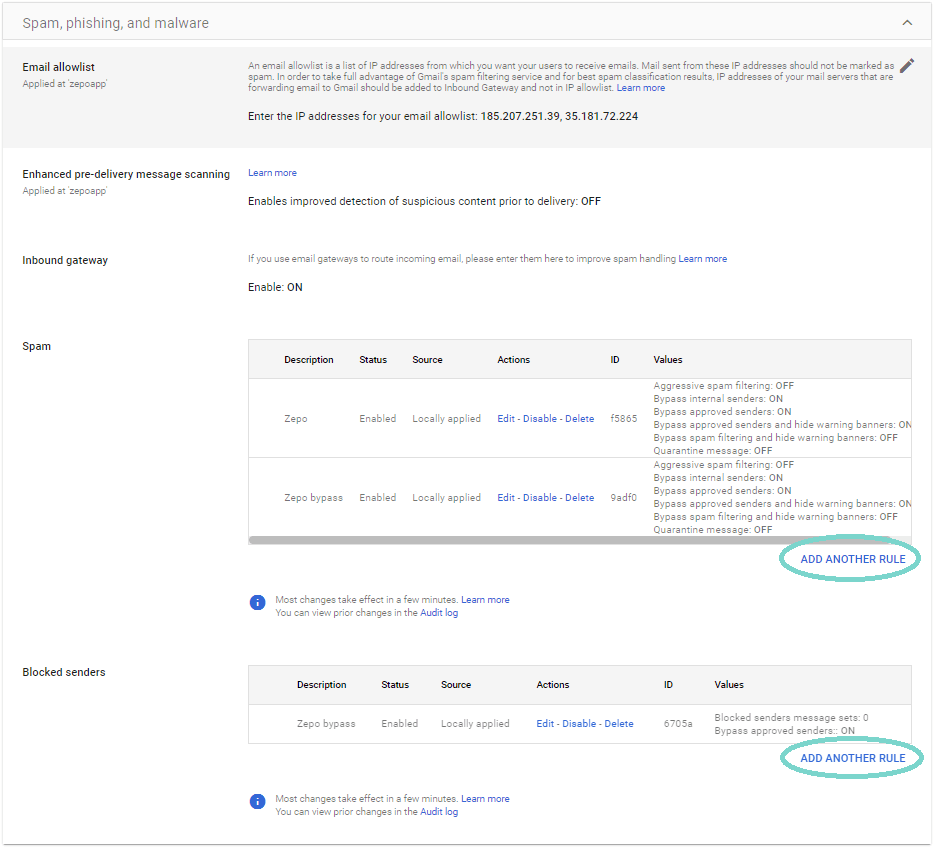
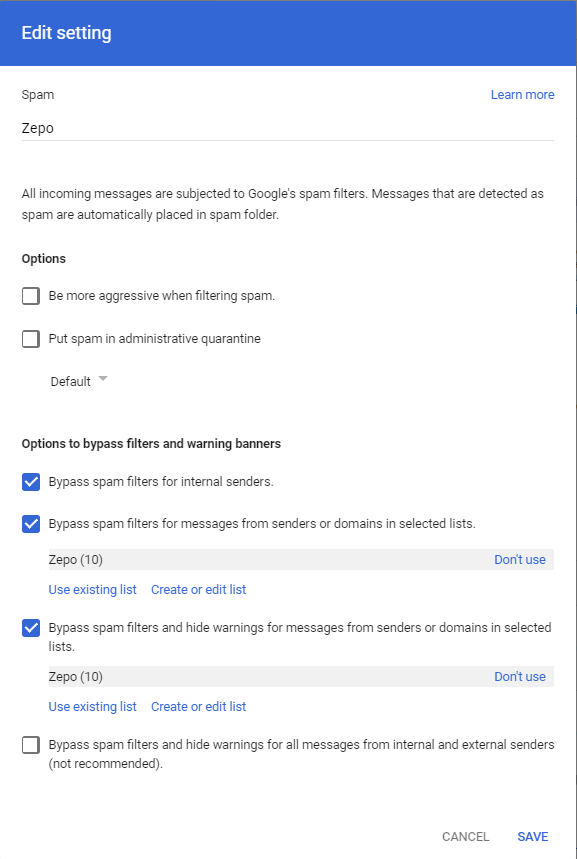
First, in the Spam section, click the Configure/Add another rule, then a new window appears. Configure it the following way:
- Put a name, i.e. Zepo
- Check:
- Bypass spam filter for interla senders.
- Bypass spam filters for messages form senders or domains in selected lists and include the list already created.
- Bypass spam filters and hide warnings for messages form senders or domains in selected lists and include the list already created.
- Don’t forget to save
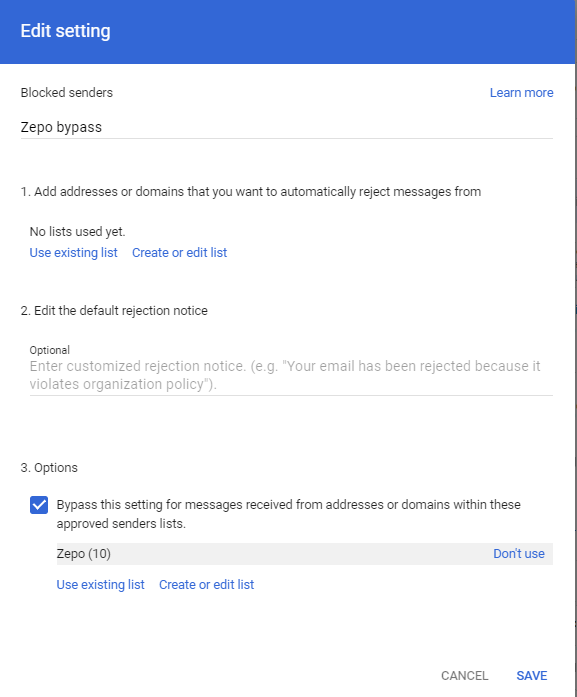
Then, in the Blocked senders section, Configure it the following way:
- Put a name, i.e. Zepo bypass
- Check Bypass this setting for messages received from addresses or domains within these approved senders lists and include the Zepo list
- Don’t forget to save
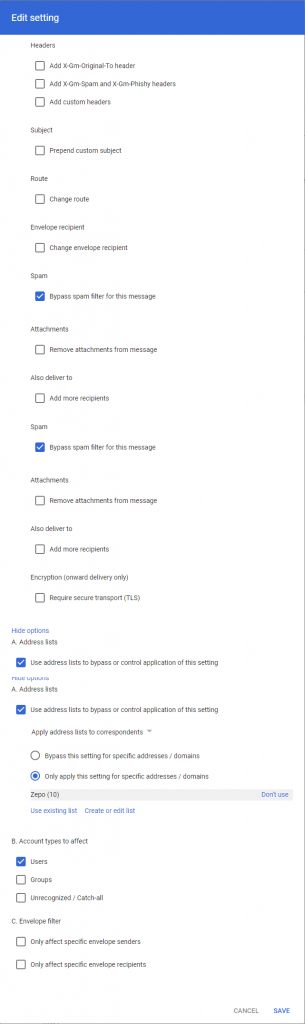
4. Routing
Finally, Zepo list has to be included in Routing feature in Routing. Configure it the following way:
- Put a name, i.e. Zepo.
- Select Inbound in Email messages to affect.
- Check Bypass spam filter for this message in Spam section.
- Click Show options button.
- In section A.Address lists check Use address lists to bypass or control application of this setting and Only apply this setting for specific addresses / domains to Zepo.
- In section B.Account types to affect select Users
Try it out
Now that you have configured Google Workspace to receive Zepo emails, go back to the platform and test the configuration sending a campaing.
5. Additional recommended configuration
If you’ve followed this guide and still see the grey warning, it’s likely due to the ‘Enhanced pre-delivery message scanning’ feature being active.
While turning it off might compromise your workspace’s security, a potential workaround is to briefly deactivate it during your phishing campaign and then promptly turn it back on afterward.